|
The second in our series about how Roslyn Glow goes about painting her plant Atriplex stipitata. Her first post was about her research into the plant. Colour matching It is important to get the colours right before the specimen dries out /dies/fades. I paint little patches of colour and label them. I use the same paper as my final painting. 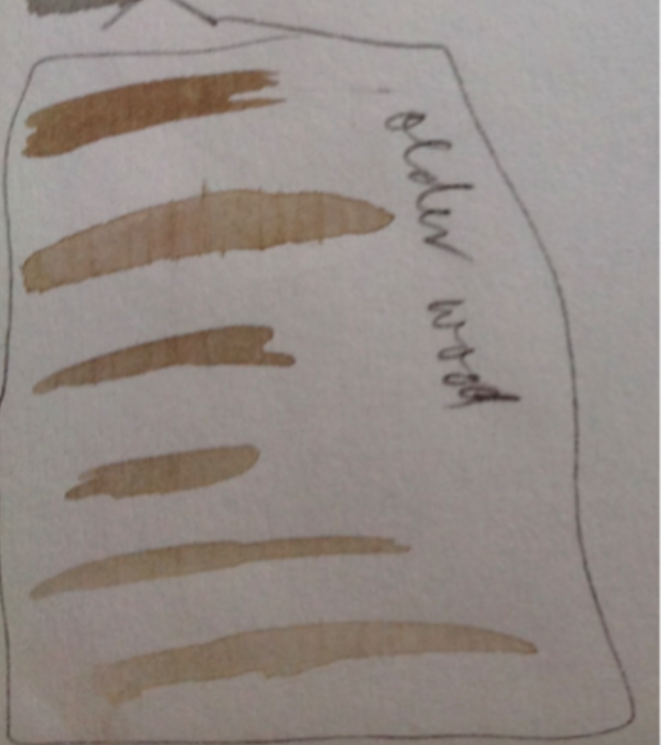 I notice that, under a hand lens or microscope, the surface of the plant looks as if sprinkled with crystals of some kind. Since this is a salt bush, I infer that they are salt crystals. I don’t know how to depict this. I discuss it with others. Mali Moir, project leader, suggests that Margaret Holloway (an artist involved in this project) has solved a similar problem. I make a mental note to consult Margaret when I get back to Melbourne. I paint a blow up of the fruit and of the male inflorescence, using the binocular microscope. I don’t have a digital microscope, so I try to photograph parts of the plant through the binocular microscope. This is not really successful.  Composition
The next task is to decide on a composition. Ideally the painting should show the back and front of a leaf, a bud, a flower, a fruit and any feature used to identify the species, including microscopic studies if microscopic features are essential for identification. Since the plant is dioecious, these details should be present for both male and female plants. The habit of the plant should also be shown, either in full or by implication. We can’t always reach the ideal. I play around with my specimens, before realising that with only one small fragment with a fruit and a couple of sprigs with male inflorescences, my options are limited. Celia Rosser, who painted all the banksias was careful to show all stages of growth of buds to mature fruits. This often required her to paint more than one branch. She carefully arranged two branches into a pleasing composition. Sometimes, at first glance it looks like a single branch, but the two branches are always separated although they form a single composition. I decide to follow a similar path. I arrange my two sprigs as best I can. We are taught to do a series of ‘thumbnail’ sketches before committing to a composition. I can’t think of any more than one. I consult Pam McDiamid, a fellow artist whose skill in composition and speed of decision making I much admire. She realigns my larger sprig. I am happy with the result. She advises me to do the thumbnails. I prepare the thumbnail sheet, but can’t think of any alternatives. The big decision is whether or not to include microscope studies, and if so, which details should I depict, at what magnification. And where should I place them. Recording the composition I photograph the specimen in its chosen position. I will print these photos when I return to Melbourne. Rough sketch I make a series of rough sketches, using my softest pencil (an 8B), on sketch paper. The size doesn’t matter, in fact the bigger the better, to get the character of the plant. The series ends with one in 2B, at about the right size. This is the part of the process I enjoy the most. Next time, in the last in the series, Roslyn will take us through the painting stage, and you will be able to see the finished painting.
0 Comments
 After our plants have been identified we begin the next part ~ the painting. Roslyn Glow has written about her process for painting Atriplex stipitata. This is the first in the series of three posts that describe the process. In this one she looks at researching and understanding her plant. Roslyn's piece was written at the request of our honorary botanist, who provides us with invaluable help. Getting to know the plant. Atriplex stipitata (Bitter saltbush, Mallee saltbush, Kidney saltbush) is a modest subject, but I know from experience that, no matter what my initial reaction, by the time I have studied a plant and found out a bit about how it makes its living and the history of its discovery, I will undoubtedly find it fascinating. 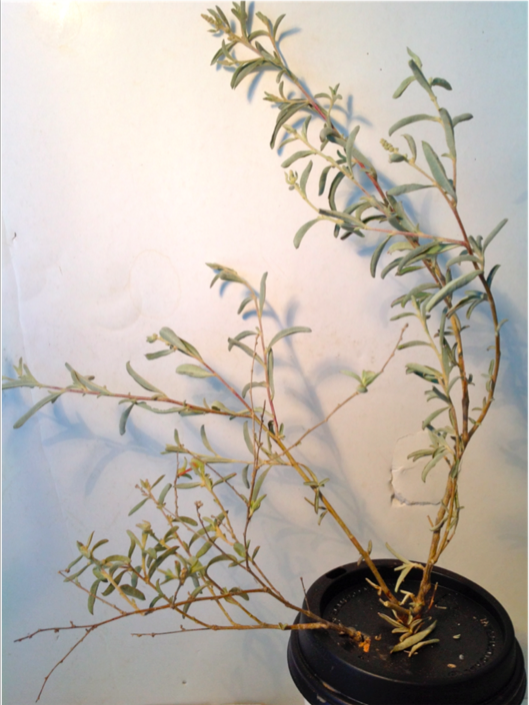 I turn the specimens around, and view them from every angle. Because very little material is available in this case, I have little to choose from. I try to identify the male and female flowers. The female flowers are hard to identify. They are said to occur singly or a few together in the leaf axils. I paste various parts of the plant onto a scrap-book page, using book covering film. 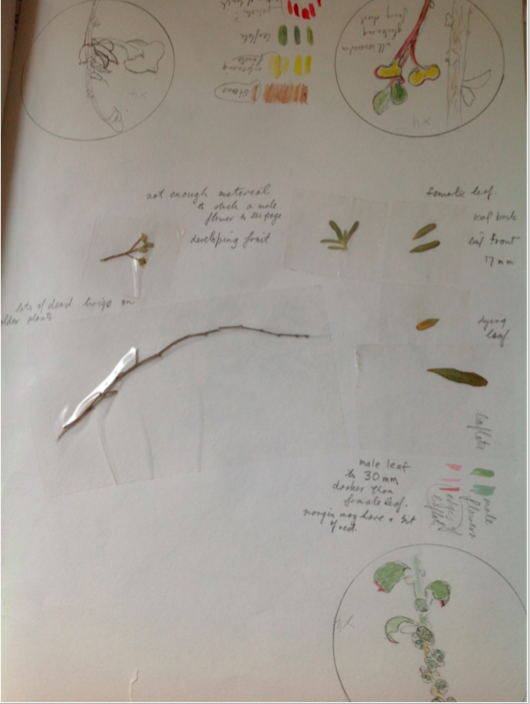 There is not enough plant material to paste up a complete series of parts and look at them under the microscope as well. The fruit is easy to identify. I look under the microscope, and try to dissect what I think is a female flower, but am unable to identify any parts. (Later I find that the female flower can be embedded in the material of the stem, unable to be examined until dissected out.) There is only one little specimen that is clearly female. I choose the more handsome of the specimens with male inflorescences, to depict in my painting. That night, I use my i-pad to research the plant. Next day I copy the most important identifying features of the plant onto my sketchpad. I am interested to find that this species can be monoecious or dioecious. Mine is dioecious, that is male and female flowers are on separate plants. The “Picture Book” (Cunningham et al) has a picture of my plant, and a drawing of the fruit. I trace this drawing onto my sketchpad. I note that my specimen’s leaves are partially closed, while the photos on the internet show the leaves as more or less flat. Eventually I discover the reason for this. When the soil is very dry, the leaves close, presumably to help conserve moisture. My specimens were clearly thirsty. Google finds me plenty of photos of A. stipitata but no paintings, and few drawings. The only comprehensive one is by Margaret Flockton, (1861-1953) the first person employed in Australia as a botanical illustrator.  Next time Roslyn will tell us about how the composition of her painting, as well as the colour matching that she does.
|
AuthorA behind the scenes look at our adventures in Menindee and how we go about creating our paintings. Archives
September 2018
|
 RSS Feed
